How to work with AdsBridge tracker
When working with our partner program, you have the opportunity to use external trackers to track more detailed statistics. This can help you analyze and optimize your traffic in more detail.
In order to start working with any tracker, initially, you need to choose one of the offers available to you in our affiliate program.
Before starting, you will need to select an offer in our affiliate program to which you will bring your traffic. After creating the flow, you will have your affiliate link, which you need to direct your traffic. (image n.1).

image.1.
To start working with this tracker, you need to register and choose the plan that suits you. After you create your account, the first thing you need to do is add your traffic source. The example you see below uses “TrafficHunt” as a traffic source. In order to add a new traffic source, you must click “Traffic source” and then “Create traffic source” (image n. 2).

image.2.
On the next page, you need to specify information about your traffic source. For many traffic sources, there are already templates. Therefore, press the “Select from template” button and look for your source (image n.3).

image.3.
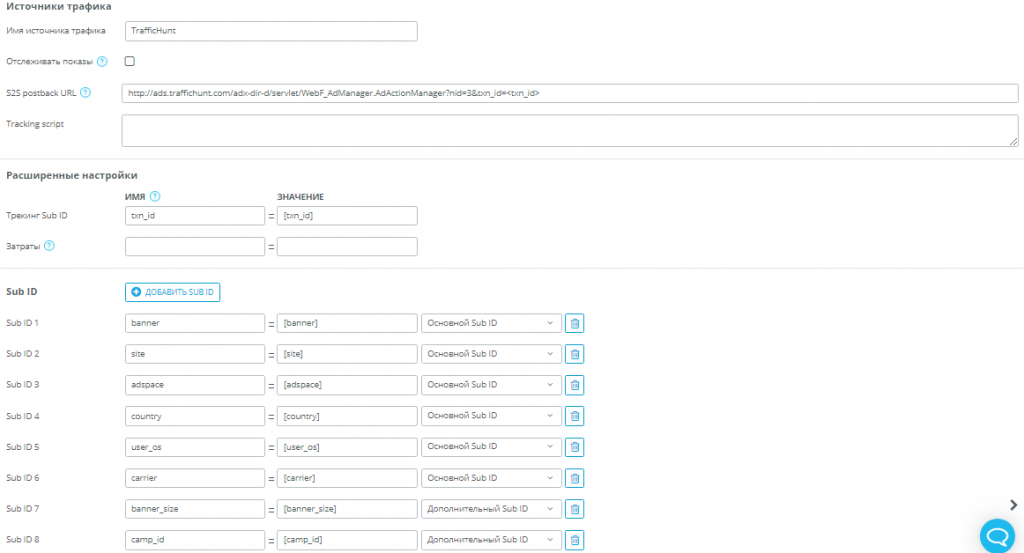
Among the templates, there is also a template for TrafficHunter, so by selecting it, all the necessary information will be substituted automatically (image n. 4). If your source is not among the available templates, all fields must be filled in manually, having previously learned macros and a postback link from your traffic source.

image.4.
After filling in all the data, you must save this source by clicking the “Save” button.
The next step is to add “Create an affiliate network” (image n. 5). This is necessary so that each time you create a new company, you do not have to re-enter data.

image.5.
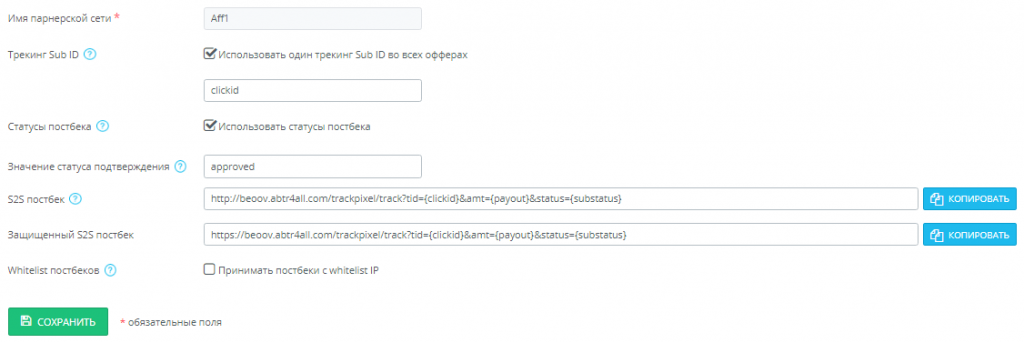
The AdsBridge tracker has our affiliate network template already in it. To make the setting in a few clicks, you must click “Templates of partner networks” (image n. 6) and select “Aff1” (image n. 7). All settings will be pulled up automatically (image n. 8).

image.6.

image.7.

image.8.
After carrying out these actions, press the “Save” button, and your affiliate network will be created in the AdsBridge tracker.
Once your affiliate network has been created, you need to move on to creating your offers. To do this, in your account, click “Offers” and then “Create an offer” (image n. 9).

image.9.
In the next window, you will need to enter the settings for your offer. (image n.10).

image.10.
- Specify here the vertical of the offer you have chosen from our partner program.
- Here, you need to specify the name of the offer that you create.
- Paste the link to the flow received in our affiliate program.
- Choose the type of payment (CPA).
- Specify the affiliate network you created.
- It is necessary to check the box so that the click ID is transmitted to our affiliate program.
- It is necessary to specify the parameter by which our partner program will be able to accept the click ID (if our case clickid).
- Here, you specify the amount of payment that you will receive when your visitors perform a certain action.
- If the offer you have chosen has a limit on the number of leads per day, you must specify this here. In such cases, you will not lose your traffic but redirect it to another offer.
After specifying all the necessary information, click the “Save” button, and your offer will be created.
The next step is to create a campaign. To do this, click “Companies” and then “Create a company” (image n. 11).

image.11
After clicking “Create a campaign,” a window with your company settings will open (image n. 12).

image.12.
- Specify the name of your campaign.
- Specify the previously created traffic source.
- Choose a unique domain that will be used for tracking. You can also add your own domain, shortening the affiliate link.
- Choose the type of your campaign. In our affiliate program, you create flows.
- Here you choose your cost model for attracting visitors.
- Specify the number of expenses for 1 unique visitor.
- This parameter, when a visitor clicks on an affiliate link, allows you to replace the link with one of the “clean” domains of this tracker, hiding the transition link.
- This parameter lets you know if the visitor is using a proxy.
- This option allows you to hide your funnels from our affiliate program. We do not recommend doing this.
- You can integrate a 3rd party pixel that will work when the Tracking pixel is activated on the landing page.
This completes the first step of setting up the campaign. To continue setting up your campaign, you must click “Next” at the top (image n. 13).

image.13.
The second step of creating a campaign is responsible for setting up traffic expansion. It is at this step that you can set up splitting of pads and offers, targeting by Geo, devices, sub id values, and other parameters.
But the setting itself is done in the “Flows” section. To do this, you must click “Flows” – “Create a flow” (image n. 14).

image.14.
Next, specify the name of your flow and, if necessary, define the stream to the group (image n.15).

image.15.
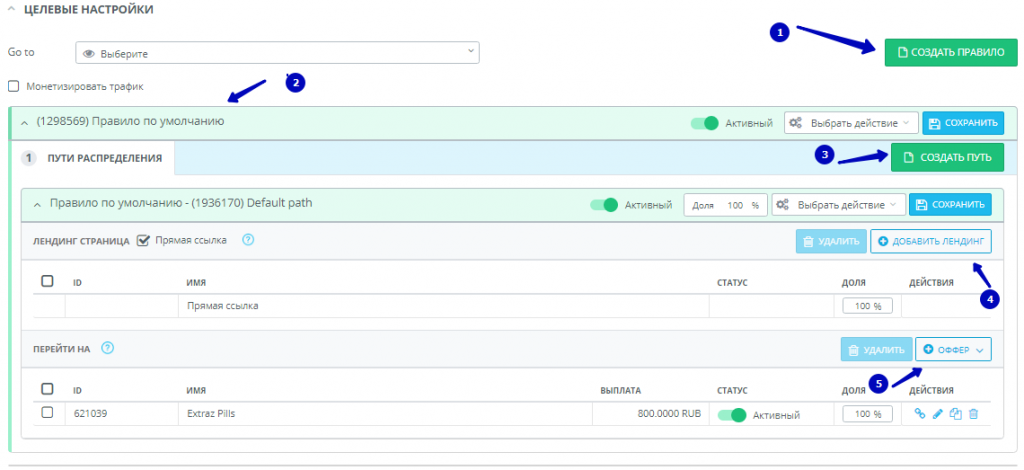
After specifying the information, click the “Continue” button, and you will see full-fledged traffic distribution settings (image n. 16).

image.16.
- You can add a new rule for distributing your traffic.
- This rule is created automatically and serves as the default rule.
- You can create a new distribution to let your traffic.
- You can add your landing page in order to distribute traffic to it as well.
- Here we indicate the offers to which your traffic will be distributed. At this stage, you can choose an offer that you added earlier or add a new one.
After you have entered all the necessary information, you need to bind this flow. To do this, we go to the second stage of setting up the campaign we created and select the flow we created (image n. 17).

image.17
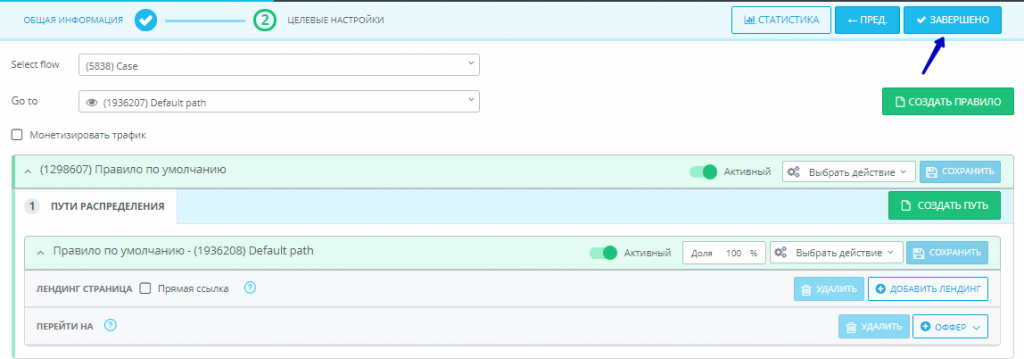
After you have selected the flow one you created, you will see its settings. Here you can edit them. If everything is fine, click “Finish” (image n. 18).

image.18.
After clicking “Finish,” you will see a window with your links (links to your companies and S2S Postback).
Move your link to the campaign and insert it into your traffic source. Thus, when clicking on this link, the user will go to your campaign (through the link of your offer).
In order for all information about your conversions to pass from our affiliate network to this tracker, you need to specify this Postback link in the stream you created (in our partner program). To do this, go to our partner program, section “Tools” – “Flows” (image n. 19).

image.19.
After that, select your flow, and click on it. Then scroll to the very bottom and click “PostBack” – “Create postback” (image n. 20).

image.20.
After that, enter a link to your S2S Postback, which you received in AdsBridge when creating a campaign (image n. 21).

image.21.
And click the “Add” button.
That’s it, the campaign is set up and ready for tracking! Parameters will be transferred in the link from your source to AdsBridge, from AdsBridge to the offer, then we receive the conversion. You can launch traffic now.