How to work with Binom tracker
You can use external trackers to track more detailed statistics when working with our affiliate program. This can help you analyze and optimize your traffic in more detail.
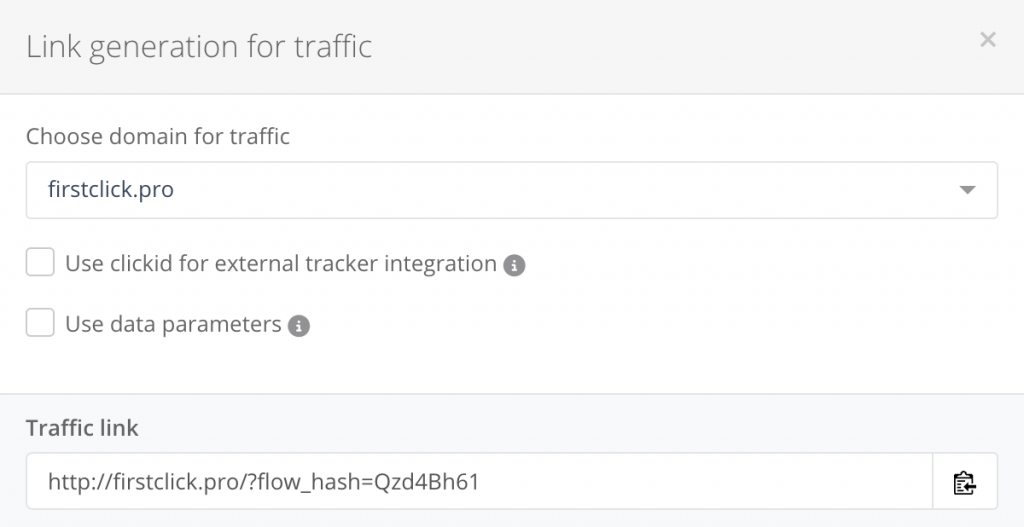
Before starting working with any tracker, choosing an offer that is available in our affiliate program is necessary. Select an offer to which you will bring your traffic. After creating the flow, you will have your affiliate link to direct your traffic (image n.1).

image n.1.
Once you created your flow in our affiliate program, you can start setting up the Binom tracker.
Binom tracker has ready-made parameter templates for different affiliate networks. First, you need to add an affiliate system to your account. To do this, press “Aff. Networks” – “Create” (image n. 2).

image n.2.
In the Binom tracker, you can load settings from our affiliate program. To do this, click “Load from the catalog,” then select Aff1. (image n. 3, image n.4).

image n.3.

image n.4.
After clicking on our affiliate network, all settings will automatically catch up. Press the “Save” button (image n. 5).

image.5.
You can start creating an offer after adding an affiliate network to your account. Go to the “Offers” – “Create” section to do this (image 6).

image.6.
Next, you can add information about your offer (image 7).

image.7.
- Any name of your offer;
- The link you received when creating a flow in our affiliate program. At the end of the link, add “&clickid={clickid}”;
- Parameters that you can add to your stream link;
- The geo of your offer;
- Offers can be grouped. To do this, select the appropriate group for your offer in this paragraph;
- Select your affiliate network added earlier (Aff1);
- The postback link is generated automatically when you select an affiliate network. Copy this link so our affiliate program can send information about incoming leads to your tracker (more on that below);
- Indicate the profit you will receive for a certain action by your visitor;
- After specifying all the parameters, click the “Save” button to save the offer.
Next, add a Binom postback link to your stream created in the partner program. To do this, go to editing your stream, go down to the very bottom, and click “Postback” – “Create postback” (image n. 8).

image.8.
Then, specify the postback link through which our partner program can send information to the Binom tracker. You copied this postback link in the previous step. (image n. 9).

image.9.
- Here you can see the parameters that can be passed to the tracker.
- Insert your postback link received in the tracker.
- Specify what statuses you want to receive in the tracker.
- Press the “Add” button to save the postback on this flow.
The final touch is to add the company. To do this, click “Campaigns” then “Create” (image n. 10).

image.10.
After clicking, you will see the settings of the company (image n. 11).

image.11.
- The name of your company;
- Grouping. Group your companies by verticals, countries, and traffic type;
- Specify the source of your traffic. It must be added to the “Traffic Sources” tab if it is not on the list;
- Specify the type of payment and the cost per click for which you buy traffic. CPC is cost per click, CPM is cost per 1000 clicks, and CPA is cost per click that will be assigned only after the conversion. If the network transfers the cost automatically, check the Auto box.
- This option allows you to hide your landing page from the affiliate network.
- Choose an available domain for your company.
- Here you can choose a traffic distribution system:
Normal Rotation — completely random route selection based on path/landing/offer weights;
Smart Rotation — smart distribution of clicks based on the uniqueness and conversion of the user on the path/landing/offer;
Fix On — assigning a user to a specific path/landing page/offer.
The campaign URL is the link you should direct your traffic to, generated after the campaign is saved.

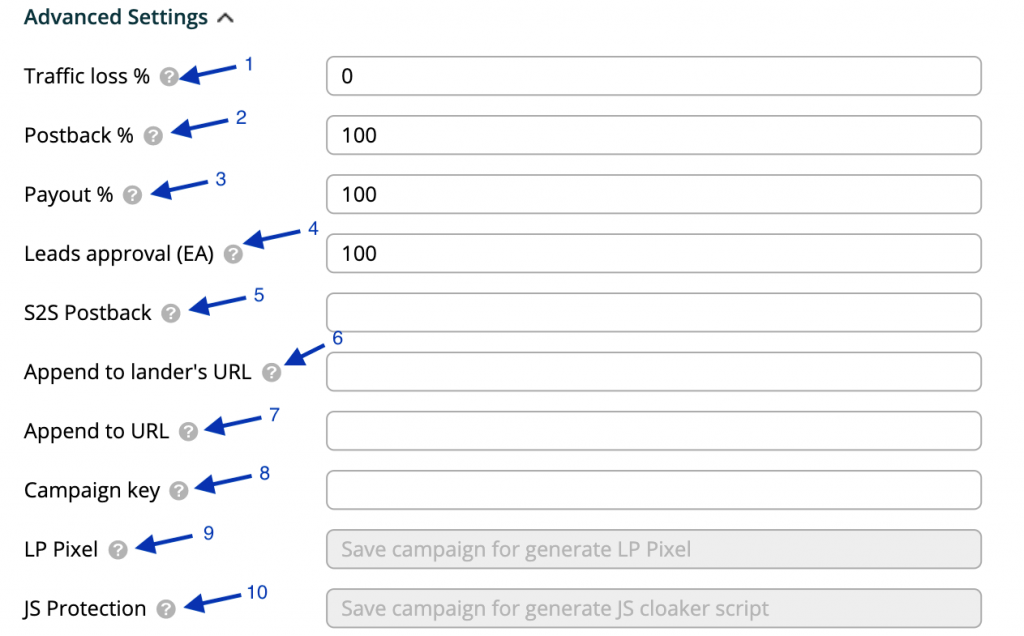
When creating your company, you can add additional settings. Click “Advanced settings” (image n. 12).
image.12.
- When working with any traffic source, traffic loss is possible on the way to the tracker. You need to specify the percentage of loss. Traffic loss is calculated using the formula: new cpc = cpc / ( 1 – losses ( losses / 100 ) ).
- Postback % — the number (percentage) of conversions sent to the traffic source. The default value is 100%.
- Payout % — the percentage of the payout that will be sent to your traffic source
- Leads approval (Expect Approve) – the expected approval rate, which is 100% by default, and you can change it.
- Individual Postback URL for sending conversions to the source or any additional services. To use it, simply paste the link into your company settings’ corresponding Advanced Settings field. By default, the Postback of the traffic source works when configured.
- It adds the specified parameters to all campaign landing pages.
- It adds the specified parameters to the Campaign URL.
- It allows you to change or specify your campaign key.
- The code for the landing page allows you to send traffic, bypassing the tracker directly to the landing page.
- If you want to use JS security, paste this code into your lander. Generated after the company is saved.
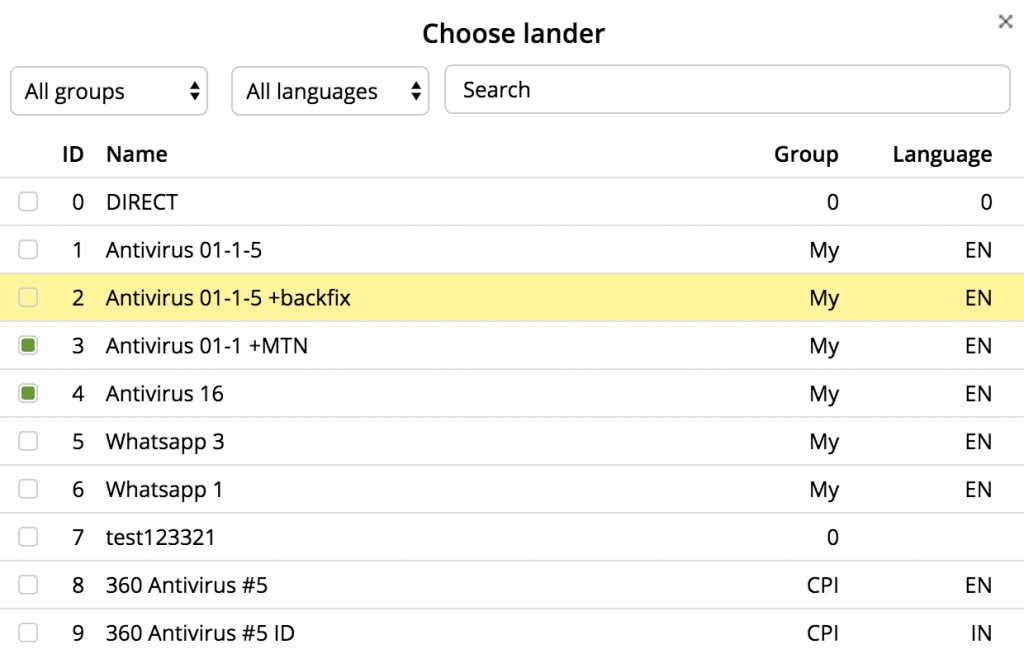
After additional settings, you need to configure the traffic path. Click on the Lander line to select a landing page in the open window. You can quickly find it by sorting the groups and using the search system. Just click on the one you want. If you want to work with a direct link to the offer, click “Direct” (image n. 13, image n. 14).

image.13.

image.14.
To select an offer, similar to a landing page, click on Offer and select it in the window. If you want to send traffic to a URL, click Direct URL to any other campaign – Campaign and a similar campaign selection window will open. When you send clicks to another campaign, all relevant tokens are transferred to it.
Also, you can add a new landing or offer on the campaign creation page. Click the “New Lander” or “New Offer” button (image n. 15).

image.15.
You can add multiple paths to your campaign. Just click Add Path.
Under your company, you can also add rules under which there will be a successful transition to your landing/offer. Press “+ Rule” (image n. 16) to do this.

image.16.
Next, you need to indicate the rules (image n. 17).

image.17.
- Choose which parameter will be used to check your rule.
- You choose whether to check whether “Yes” or “No” of your parameter.
- Specify what value you need to have for the successful execution of the rule.
- Save your changes.
After setting all the values, click the Save button in the page header to save the campaign.
To get a link to which you want to direct traffic, go to the “Campaigns” section, select the company you created, and click “Edit” (image n. 18).

image.18.
In the next window, you will see the link for traffic directing in the “Campaign URL” section (image n. 19).

image.19.
That’s it, the campaign is set up and ready for tracking.