Connection to the offer
To start working with our affiliate program, you first need to decide where you will bring users and what payment you will receive for certain actions by them.
Article navigation:
1) Choosing an offer
2) How to filter offers
3) Offer page
4) Creating a flow
5) How to request access to the offer
To select your first offer, you need to go to the section “Offers” => “All offers” in the menu (image n. 1).

image n.1.
Then you get to the offers section. You can filter (it is located on the left side of the screen) offers by verticals (offer direction), categories (each vertical has its own categories of offers), GEO (countries), conversion types (COD – a person pays for a product only after receiving it on mail; SS – a person pays money immediately, even before he receives something; Trial – a payment model by subscription), by targeted actions and by traffic sources (sources from which it is allowed to send traffic to the offer) (image n. 2).

image n.2
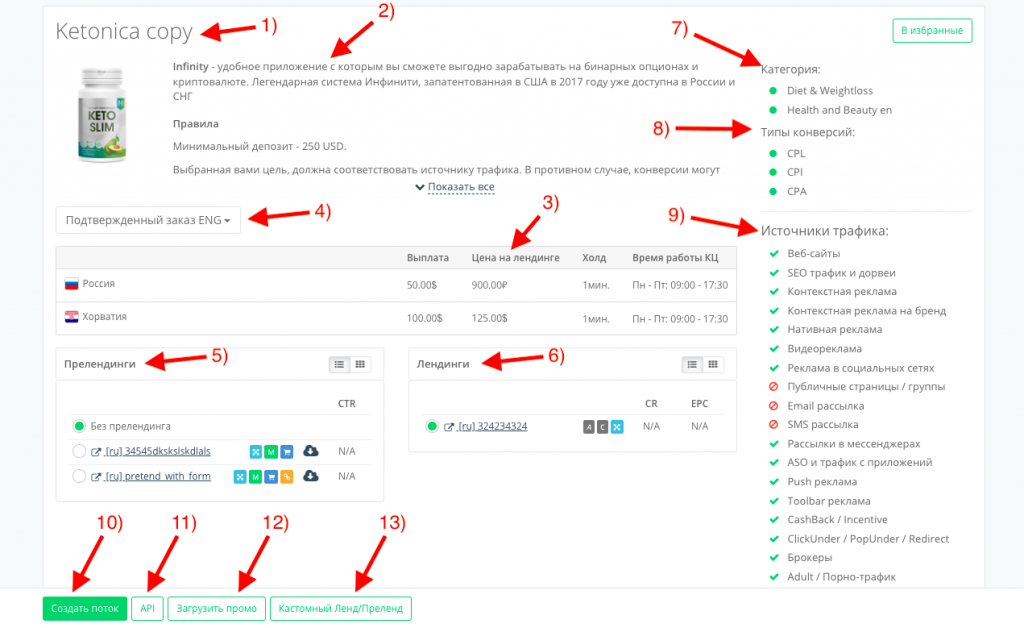
After you have chosen one of the offers, you need to familiarize yourself with all the details about it. To do this, simply click on its name, after which you will see all the information about the offer (image n. 3).

image n.3.
- The name of the offer (in this case, name of the the product).
- Description of the offer, advertised product.
- Information about your payments when working with this offer.
- Description of the action for which you will receive a payout.
- A site that warms up the product.
- A site that will have targeted advertising.
- Offer category.
- Conversion type.
- Allowed traffic sources (Green tick – allowed).
- Creating a flow for this offer (getting your affiliate link).
- API work.
- Possibility to download photo and video materials for the offer.
- Requesting a custom landing/pre-landing from an advertiser.
If your traffic source is suitable for the offer, the payout is sufficient for you – choose a transit (pre-landing), or landing, and click the “Create flow” button (image n. 4).

image n.4.
- Enter any name for your flow.
- Choose one of the available goals (for which you will be paid).
- If you have chosen the wrong transit, you can change it.
- As well as transit, if you have chosen the wrong landing page, you can change it.
After filling in all the fields, click the “Create Flow” button. After that, a window with your affiliate link will open. Also, in this window, you can set parameters for using external trackers, and if you have parked your domain in our affiliate network, you can use it as the domain of your affiliate link (example n. 5).

image n.5.
- Choose an available affiliate program domain or your parked domain.
- It is possible to connect external trackers to track detailed statistics.
- All statistics in our affiliate program can be divided into some data parameters. To do this, click the checkbox here and specify your data parameters.
- This is the link that you can use to attract users to the advertised resource.
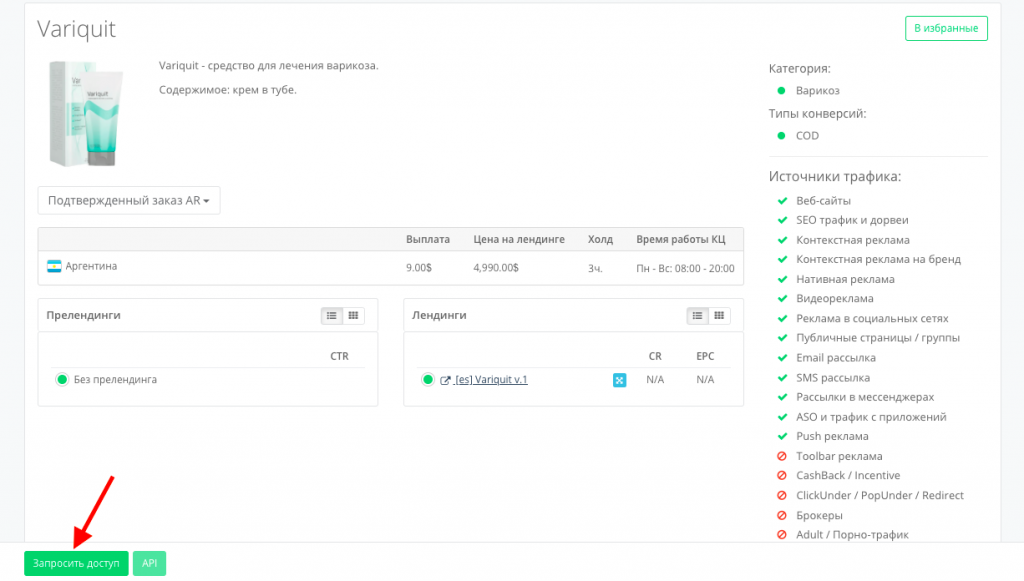
If this icon is next to the offer you are interested in (example n. 6), then you do not have access to it yet. In order for this offer to become available to you, you need to request access.

image n.6.
In order to request access to the offer you have chosen, you need to click on the name of the offer, get acquainted with all the information about it (permitted traffic sources, payment rules for a certain action, available transits/landing pages) and click the “Request access” button (green button below, example n. 7).

image n.7.
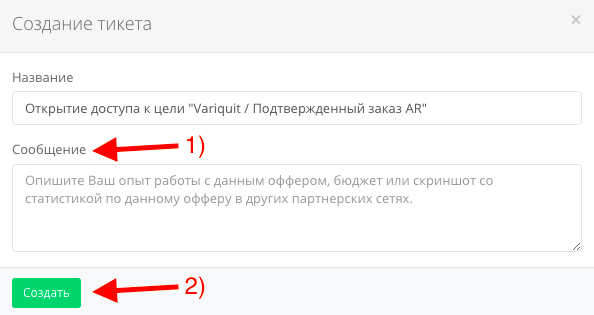
After that, you need to describe in the appropriate field (1) your experience with this offer (or similar ones), your budget, sources of your traffic, and/or screenshots of your payouts/statistics from other affiliate programs and click the “Create” button (2) (example n. 8).

image n.8.
After clicking the “Create” button, a ticket will be created with your request to open this offer. Your personal manager will process it as quickly as possible. In order to find out the solution to your request, you need to go to the “Tickets” section (example n. 9) and click on the corresponding request.

image n. 9.
After the successful approval of your request, access to the offer you have chosen will be opened, and you will be able to connect to it using the instructions provided above.